Showing posts with label tools. Show all posts

Friday, July 31, 2009

GridBeamers


How on earth have I missed this concept / website for so long?
"Gridbeamers are the Grid Beam Users Group united to build a better world through logical thinking and reuseable parts."
Basically, the idea here is to build an erector set system for larger projects. Brilliant! I love coming up with projects and playing with them, but tearing them apart for re-use is really a paint. Enter, the GridBeam:

If you think that this is just some square stock with uniform holes drilled in it, then you are absolutely correct. I love it!

Check out this project... It's an EV! It's a small one, but I can see how the GridBeam approach could help build a normal EV. The first thing that comes to mind is battery racks. It's a whole lot less intimidating to build a rack of out these than to weld from scratch for some builders.


I can almost picture it now - build up a car frame and keep tweaking it until I like it. Then, when everything is running the way it should, mold some fiberglass over foam and voila! My new custom EV is all ready to go!

This is pure simplicity - wonderful!

Saturday, July 25, 2009

Power Supply


Here's a little project that I've been meaning to get to since before the big move to the new house - building a benchtop power supply out of spare computer parts. Why build a power supply? Good question - lots of answers:
  • The only motorcycle battery I currently have is in my running Kawasaki Vulcan. I don't really want to spend time disconnecting the battery from that bike just for bench testing (there is no way that I would test stuff while hooked up to my bike).
  • I would rather not have to fool with recharging a battery just for testing
  • I've been itching to solder something and do an electronics project.
  • If I really mess something up, the power supply is smart enough to shut down rather than fry itself. If I cross the leads on a battery, ouch (I've heard that it's like crossing the streams).
  • This power supply also outputs +5v and -12v. I'm sure that will be handy for an electronics project sooner or later.
Credits
Behind every great project (and even mediocre ones like this) is usually list of semi-willing contributors:
  • Chris H for providing phone support while in Radio Shlock picking up parts (the power resistor worked like a champ).
  • Tim M for providing the donor power supply.
  • Ulysses and Wendy for the gift certificate that bought the heat shrink tubing.
  • Mr Barrowman for letting me play with breadboards in Technology class during the formative years.
Resources
Turning an ATX power supply into a benchtop power supply has been done many times by people who take much better pictures than I would, so here is what I used (there are many available online, but this is what I stumbled on):
  • This was a nice simple post on to build the unit. It even had some notes for making a more simple setup (no switches, LEDs, etc).
  • Instructables via Make - This was an okay set of instructions, except for a few key issues (the plan was more complicated than I wanted - I just wanted to plug it in - no switch necessary). More importantly, the plan called for a fused ground (readers tore the author a new one for that in the comments). That's not a safe / cool way to fuse a circuit, so I didn't do that.
Things I Learned
I always learn something from these projects.
  • I really need a better soldering iron. I still have my old nasty 30W pencil from Radio Shack. Specifically, I need something that I can rank up the heat on for soldering larger gauge wires. Make has had a lot of articles about just this sort of thing lately.
  • I need a better soldering station. I'm using an old sponge for cleaning and a screwdriver rack to hold my iron. It's neither safe or efficient.
  • Heat Shrink tubing is just cool as hell. It really makes a project look nice and neat. I think that it's a bit more robust than electric tape as well.
  • I should have drawn the circuit before I started. It was a dirty simple setup, but drawing it out would have saved some unbundling of "unused" wires. My workbench is a whiteboard, so there's no excuse there.
  • I should have saved the rest of the computer that I pulled the power supply from. It had handy things like LEDs that would have made the project look a little more nifty. Although it should be noted that it's pretty obvious when the power supply is on because the fan is louder than hell.
  • Wearing eye protection while drilling isn't as dumb as it sounds. My drill bit caught and spun the power supply around while the wires whipped around and broke one of my favorite Coke glasses. Darnit.
It looks like the "cool" way to build the unit is to stick the fan on the outside of the power chassis. I didn't really need any extra room on the inside, so I just left it where it was (the wires for the fan were pretty short anyway so this was the lazy option).

Now I can get to work on getting some of the basic electronics kicking on the bike (signals, brake lights, etc).

Wednesday, July 8, 2009

Rolling Chassis!


It's back! I was so excited that I took the chassis for a spin around the cul-de-sac. As it turns out, my street is much more downhill then I ever suspected. Fortunately, the back brake (while not fully adjusted) operated enough to prevent another trip to the hospital.

While trying to figure out how to fill the forks with oil, I ran across this little gem from Walmart:


While it looks like something from a slasher flic, it's a "Flavor Injector." It has two stellar properties that I needed:
  • It was accurate enough to measure the amount of oil I need to inject
  • The needle part allowed me to inject the oil down in the fork itself instead of waiting for it to drain in slowly. I customized the syringe by cutting of the end, but otherwise it performed brilliantly.
Next up is finishing up the front brake. After I took the pic, I went ahead and mounted the front caliper and the brake lever. The pads and the master are in great shape, but some of the bits in-between might need some love. The bits are around 35 years old, so it's a wonder any of it works at all.

Monday, February 2, 2009

Toolbox Upgrade

Finally, we got a break in the weather. It has been very cold here as of late and that has slowed progress significantly. So, when a nice 63 degree shows up, do I start sanding the frame down? Of course not! I found a great deal on a toolbox and couldn't say no.

This was a floor model at Kmart. Ever since Sears bought Kmart, I've enjoyed browsing the tool section there for good deals on tools. Here are the shiny new toolboxes:


I went to town and organized all of my tools. I've been getting more and more organized with my tools - my garage time is limited and I don't like spending the whole time looking for tools.


This was a huge upgrade to the way I was storing tools. As you can see, I added some black drawer liner to protect the toolbox and keep the tools from moving around too much.

If you look closely, you'll notice that I had to drill out the lock on the top toolbox. This is how I got the units so cheap - they were floor models and the keys were missing. They were already knocked way down in price when I showed up, but the manager was kind enough to take some more money off for the lack of keys.

I actually tried to pick the lock before drilling. It was an utter failure. I know more about how locks work now, and I think I had the theory down, but in practice I won't be picking locks Magnum PI style anytime soon.

Before, this was my main toolbox:


It's a solid toolbox, and I'm going to keep using it. My dad gave me this toolbox when I left for college and I've been using it ever since. While it is too small to hold all of my tools now, it will make a great toolbox for keeping all of my files / allen wrenches, etc. I'm going to clean it up and add some drawer liner.

Here is the toolcart I was using:


This was actually pretty handy. I should have taken a picture of this before I took all of my tools off of it. I had the little black toolbox on the bottom and all of my screwdrivers in the little tool rack on the side. This was a very inexpensive way to keep all my tools together. Whenever I did work on the car (brake jobs come to mind), I would just wheel this little guy over to where I was working. It saved a lot of walking back and forth to the toolbox. Since I'm still recovering from a pretty stellar ankle injury, the less walking I have to do on the hard concrete floor, the better.

It will still be handy to have a cart, but I'll take off the tool holder apparatus.

Wednesday, December 31, 2008

Who got a shiny new toy for Christmas?


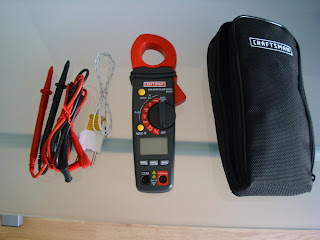
Okay, it was me. And I didn't get this as a gift per-se. I put together some gift certificate money and bought myself a mackin multimeter for my EV endeavors. I had a decent unit before, but I lent it out and it has fallen into the "permanently borrowed" category of tools.

It does all sorts of clever stuff:
  • AC / DC voltage
  • AC /DC Amps
  • Temp
  • Frequency
  • Capacitance
  • Resistance (is futile)
Here's is the product info page from Sears:
http://www.sears.com/shc/s/p_10153_12605_03482369000P

I haven't had a chance to use it. In fact, the night I got it home to play with it, the power went out at the house. Maybe it's a sign that the EV project is doomed. Maybe it's just a funny coincidence. I'll operate under the assumption that it's the latter.